用户中心3-前端登陆页访问后端接口修改
日期:2024.02.05 作者:31520-tfzhang
今天主要进行登录页的表单提交的变量及接口参数等的修改。
1、修改账户和密码变量:
登录页输入账户和密码后,数据会提交给后台,那这个提交过程具体是怎么样的呢?定位到源代码/user/Login/index.tsx中的onFinish方法:
onFinish={async (values) => { await handleSubmit(values as API.LoginParams); }}此处就是打包表单数据,处理提交的入口。看下handleSubmit方法的源码,handleSubmit方法的参数是API.LoginParams:
xxxxxxxxxx type LoginParams = { username?: string; password?: string; autoLogin?: boolean; type?: string; };根据我们后端的参数,首先将API.LoginParams修改为:
xxxxxxxxxx type LoginParams = { userAccount?: string; userPassword?: string; autoLogin?: boolean; type?: string; };知识点:修改时建议光标移动到username(password),然后Shift+F6,这样可以同时全局修改,以免有遗漏修改的地方。
除了修改API.LoginParams结构,还要修改/user/login/index.tsx的登录表单数据;其中的代码:
xxxxxxxxxx <ProFormText name="username" fieldProps={{ size: 'large', prefix: <UserOutlined className={styles.prefixIcon} />, }} placeholder={'请输入账号: '} <ProFormText.Password name="password" fieldProps={{ size: 'large', prefix: <LockOutlined className={styles.prefixIcon} />, }} placeholder={'请输入密码:'}上述的两个name变量要修改为对应的userAccount和userPassword。修改后代码如下:
xxxxxxxxxx <ProFormText name="usrAccount" fieldProps={{ size: 'large', prefix: <UserOutlined className={styles.prefixIcon} />, }} <ProFormText.Password name="userPassword" fieldProps={{ size: 'large', prefix: <LockOutlined className={styles.prefixIcon} />, }}
2、设置login访问的参数
因为我们的后端登录接口为:
xxxxxxxxxxlocalhost:8080/user/login所以,我们要修改前端登录接口的url,其中端口号要修改为8080,ant design pro原来的端口为8000;
另外path要修改为/user/login。
2.1 path修改为/user/login
基于/user/login/index.tsx中的handleSubmit方法,我们追溯到如下的代码:
xxxxxxxxxx/** 登录接口 POST /api/login/account */export async function login(body: API.LoginParams, options?: { [key: string]: any }) { return request<API.LoginResult>('/api/login/account', { method: 'POST', headers: { 'Content-Type': 'application/json', }, data: body, (options || {}), });}主要修改第2行代码,同时注释也顺便更新下;
xxxxxxxxxx/** 登录接口 POST /api/user/login */export async function login(body: API.LoginParams, options?: { [key: string]: any }) { return request<API.LoginResult>('/api/user/login', { method: 'POST', headers: { 'Content-Type': 'application/json', }, data: body, (options || {}), });}注意:此处我们保留/api关键字,后续修改后端来匹配。
2.2 修改端口
我们要设置前端访问的url和接口,通过不断地深入源码,发现并没有哪里统一设定 localhost:8000,于是转而查找umi以及pro design的官方说明文档,其中ant design pro中相关内容:
xxxxxxxxxx可以在 src/app.tsx 网络请求配置内增加如下配置:export const request: RequestConfig = { };所以,我们在app.tsx中增加如下的代码:
xxxxxxxxxxexport const request: RequestConfig = { prefix:'http://localhost:8080', timeout:10000};
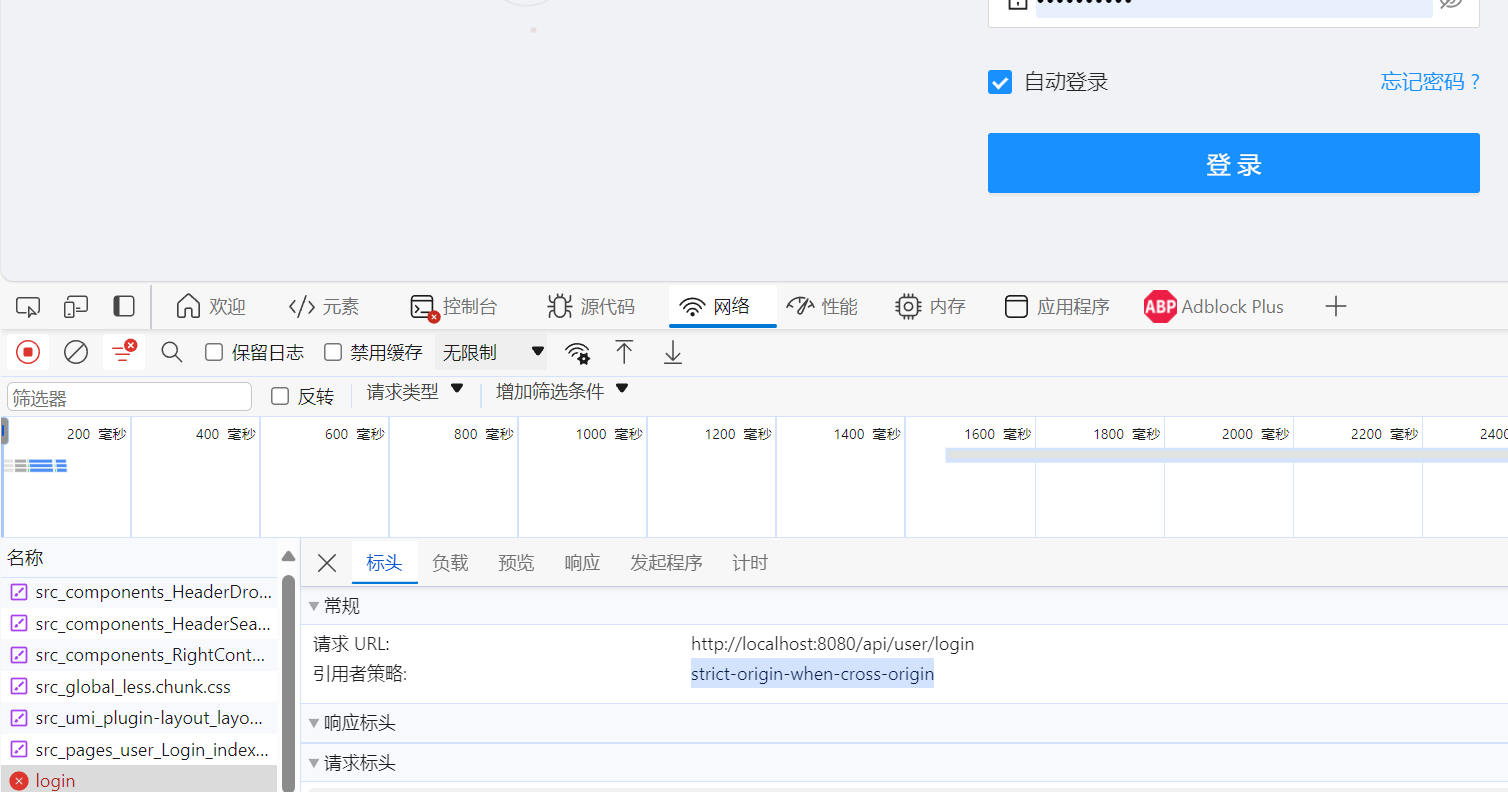
修改刷新,重新登录后,打开浏览器开发者工具,可以看到图1所示:
访问的地址的确从原来的8000变为8080;
另外出现跨域的问题,strict-origin-when-cross-origin;
什么是跨域问题?
跨域就是一个域名的网页去请求另一个域名的资源,两个请求的协议(比如http),域名(比如说localhost),端口号三者一模一样(其他可以不一样)才算两个请求在同一个域内,三者但凡有一个不一样都是跨域。比如在我们的案例中,登录页的地址是:
xxxxxxxxxxhttp://localhost:8000/user/login而我们的后端api地址是:
xxxxxxxxxxhttp://localhost:8080/api/user/login两者之间的端口号不一致,所以导致跨域问题,而浏览器为了保证网络安全,是不允许跨域访问的。
2.3 解决跨域问题
我们在前端解决跨域问题,在ant design pro中,包含一个配置代理的文件:/config/proxy.ts,根据提示我们的修改如下:
xxxxxxxxxxexport default { dev: { // localhost:8000/api/** -> https://preview.pro.ant.design/api/** '/api/': { // 要代理的地址 //target: 'https://preview.pro.ant.design', target: 'http://localhost:8080', // 配置了这个可以从 http 代理到 https // 依赖 origin 的功能可能需要这个,比如 cookie changeOrigin: true, }, },此处target设置为:
xxxxxxxxxxtarget: 'http://localhost:8080'意味着:
xxxxxxxxxxlocalhost:8000/api/** -> localhost:8080/api/***如此的话,我们要将app.tsx中的requestConfig代码更新如下:
xxxxxxxxxxexport const request: RequestConfig = { prefix:'http://localhost:8000', timeout:10000};然后我们启动后端,假设localhost:8080/api/user/login接口已经通过测试,打开浏览器开发者模式,图2所示:
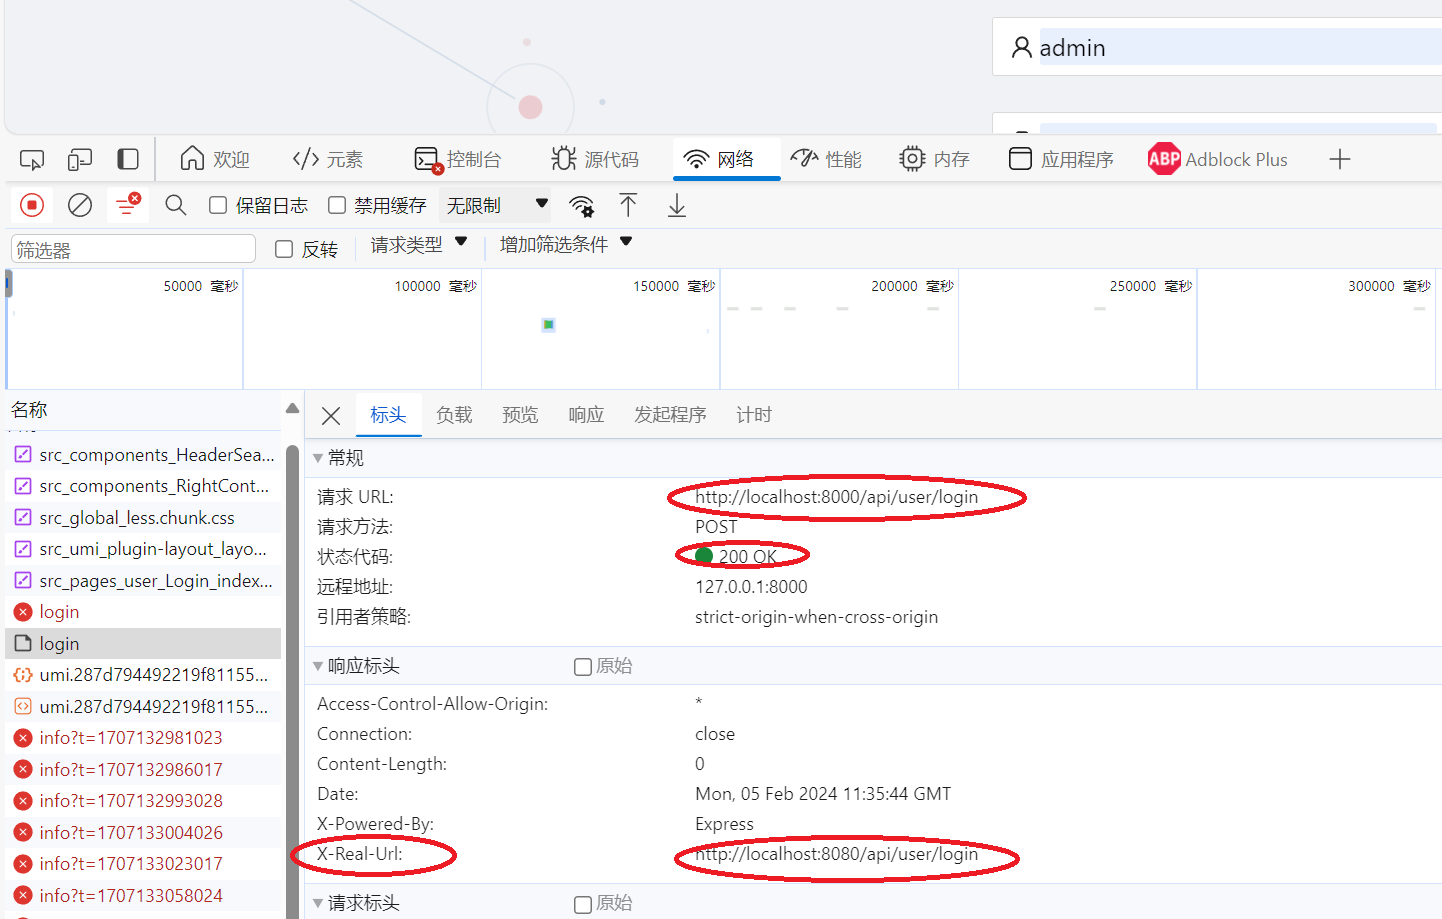
可以发现已经解决跨域访问,其中的请求URL是8000端口,而真正访问的端口是8080,X-Real-Url所示。